You can use multiple ways to disable webcam in Windows 10. In addition to classic methods, starting with Build 21354 and later, there is a new page in Settings to control cameras connected to your computer.
In the modern world, it is difficult to imagine a computer without a webcam. The popularity of streaming, remote work and study, video calling and other tasks requiring a webcam have dramatically increased the demand for these peripherals. Along with the growing popularity of webcams, user concerns about privacy have grown, and hence the need for physical shutters and software capabilities to quickly turn off the webcam on demand.
Modern cameras have not only a shutter to physically block the camera, but also small LED indicators that indicate that the camera is working. For devices without LED indication, Microsoft provides software-based on / off OSD notification that appear on the screen and in the action center.
The most effective way to turn off your webcam is to physically disconnect it from your computer. But that’s obviously not convenient, so more compromise ways are needed to turn off the webcam in Windows 10. There are two ways to do this without downloading third-party software.
Windows 10 build 21354 and newer has a new section for managing cameras connected to your computer. At the time of this writing, the section is available in preview builds of Windows 10. The release of this new feature might happen in the second half of 2021.
Disable webcam in Windows 10
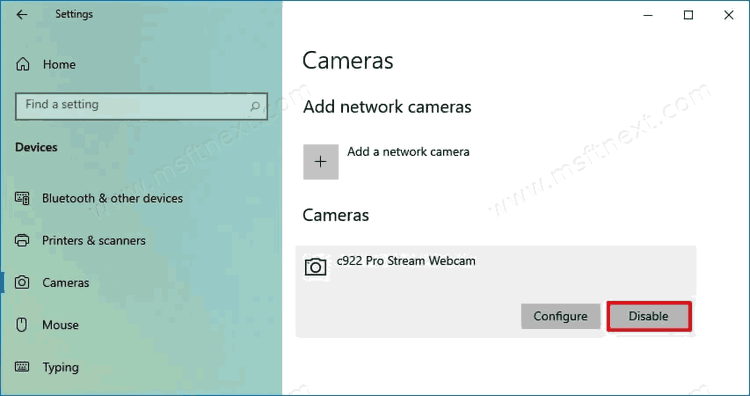
- Open the Windows Settings app.
- Go to Devices > Cameras.
- Find the camera you want to disable in the list and left-click on it.
- Select Disable and confirm the action.

Done. The OS will disable the camera for all installed apps, while leaving the option to turn it on at any time.
However, if you have not yet upgraded to a new version of Windows and do not want to risk installing pre-release versions of the operating system, you can turn off the camera in Windows 10 using Device Manager.
How to turn off webcam in Device Manager
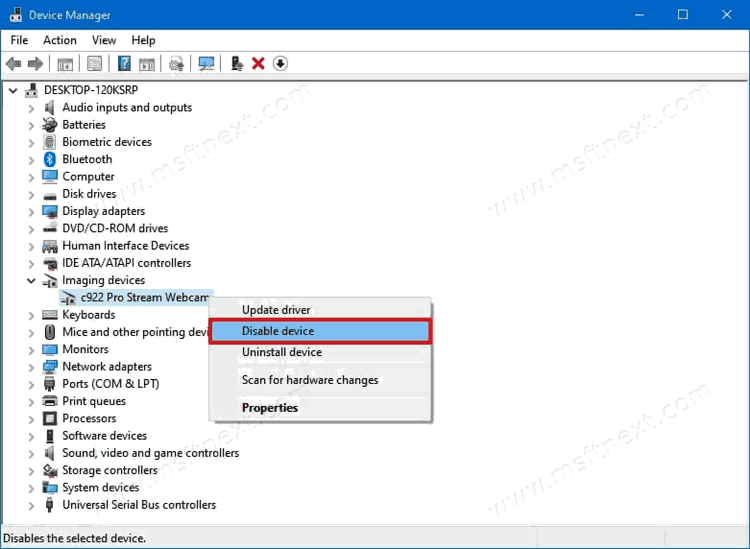
- Start Device Manager by using the Win + R keyboard shortcut and entering devmgmt.msc in the Run window, or in any other way.
- In the list of devices, find the Cameras section and expand.
- Find the camera you want and right-click on it. Select Disable device.

Confirm the action.
Done. Now you know how to turn off the camera in Windows 10.
It is worth noting that both methods provide an easy and quick option to turn the camera back on. Here’s how to do it.
If your computer has been updated to Windows 10 version 21354 (you can check this using the Win + R – winver key combination), do the following.
How to enable camera in Windows 10
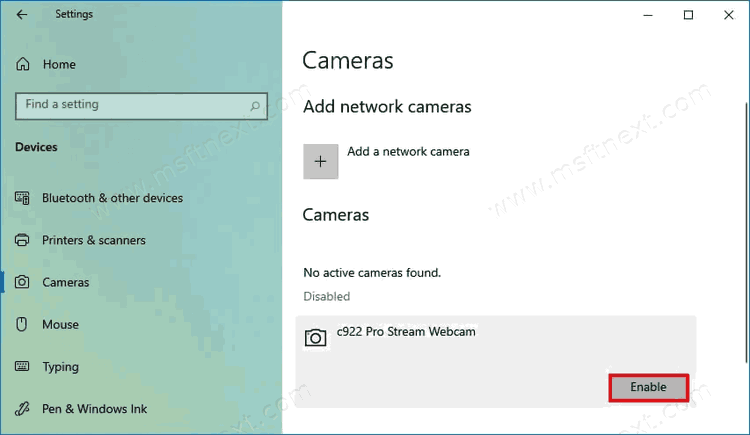
- Press Win + I to open Windows Settings.
- Go to System> Cameras.
- Find the disabled camera you in the list and left-click on it.
- Click on the Enable button.

You can also enable the camera through the Device Manager.
Turn on webcam in Device Manager
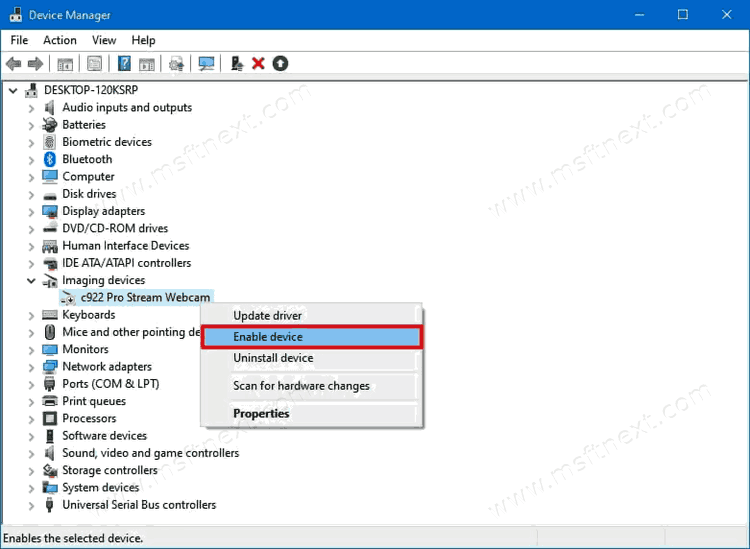
- Open Device Manager.
- Find the Cameras section and expand it.
- Right-click on the desired camera and select Enable device.

Done. Windows will enable the camera device, after which the installed applications will be able to work with it again.
Note: Remember that any software-based way to turn off your camera in Windows 10 cannot be 100% secure. As stated above, the most effective way to ensure that no one is tracking you through your webcam is to close the physical shutter or simply disconnect the camera wire from your computer. The latter, unfortunately, will not work for laptop and tablet owners.
