File extensions help us to identify file types. File Explorer in Windows 10 doesn’t show file extensions with default settings. This post explains how to change make File Explorer to always show or always hide file extensions for files in Windows 10.
It is recommended to make Windows 10 always show file extensions next to file names in File Explorer so that you can identify file types with ease. Otherwise, it is a security risk as anyone could send you a malicious file named “Readme.txt.exe” but Windows will hide the .exe portion. So an inexperienced user can inadvertently open the file thinking that it is a text file and malware will infect the PC.
You can see the extension of a file by right-clicking it and opening its properties. The extension along with the registered app will be visible in the Properties dialog. But making the File Explorer to always show file extensions is a good idea to check the file type with a glance at the file name. There are three quick ways to show or hide file extensions in Windows 10 File Explorer.
Show Or Hide File Extensions In Windows 10 File Explorer
- Open File Explorer (Press the Win + E keys).
- Click on View and enable the option ‘File name extensions’ to show extensions of files in File Explorer.

- To hide file extensions, you need to disable the same option.
Show Or Hide File Extensions With Folder Properties
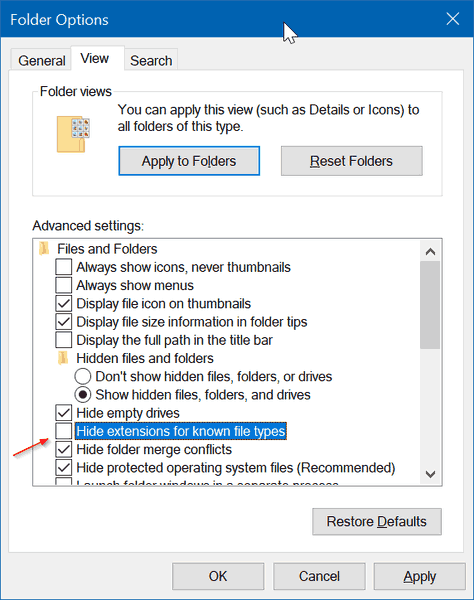
- Type file ‘explorer options’ in Start menu or taskbar search box, and Press Enter to open File Explorer Options.

- Switch to the ‘View’ tab. Disable (uncheck) the check box ‘Hide extensions for known file types’ to show file extensions. Click on the ‘Apply’ button.

Show Or Hide File Extensions Using Keyboard Hotkeys
- Open File Explorer(Press the Win + E keys).
- On the keyboard, press the ‘Alt’ key, then press the ‘V’ key, and, finally, press the ‘HF’ keys to show or hide file extensions.

